ADA Requirements for Bathrooms

Infographic – ADA Requirements for Bathrooms

Download our print-friendly infographic on “ADA Bathroom requirements .” This infographic highlights the essentials of ADA-compliant bathrooms, from their legal importance to their role in creating inclusive environments for individuals of all abilities. Whether it’s a shared restroom in a busy airport or a child-friendly facility in a school, ADA bathrooms ensure safety, comfort, and accessibility for everyone. You will also find ADA bathroom guidelines to prioritize safety, comfort, and independence for all users.

AORBIS supplies a wide range of ADA-compliant bathroom accessories to meet these essential standards. Contact us to learn more!

ADA Door and Hardware Requirements

ADA Door and Hardware Requirements

Infographic - ADA Door and Hardware Requirements

Download our print-friendly infographic on “ADA Door and Hardware Requirements.” This visual guide summarizes key ADA standards, including minimum door widths, maneuvering clearances, threshold heights, and hardware specifications. Key highlights include the required 32-inch door widths, low-force hardware, and additional considerations such as smooth surfaces, controlled closing speeds, and proper lighting to enhance accessibility. Perfect for architects, builders, and facility managers striving for ADA compliance.

AORBIS supplies a wide range of ADA-compliant doors and hardware to meet these essential standards. Contact us to learn more!

The Ultimate Guide to Designing an ADA-Compliant Bathroom

The Ultimate Guide to Designing an ADA-Compliant Bathroom

Having an accessible bathroom is essential for people with disabilities or mobility issues. The Americans with Disabilities Act (ADA) sets standards to ensure bathrooms are designed to be usable by everyone, regardless of their physical abilities.

This guide will walk you through the key elements of an ADA-compliant bathroom, from understanding the requirements to practical tips for renovations.

Understanding ADA Requirements for Bathrooms

ADA Requirements for Bathrooms [Informative Infographic]

1. Accessible Route

The bathroom must have an accessible route that allows for easy entry and exit. This means having a clear path free of obstructions, with enough space to navigate a wheelchair or other mobility aids.

2. Door Width and Clearance

Bathroom doors should be at least 32 inches wide to accommodate wheelchairs. This requirement should be kept in mind when sourcing door products from door distributors. There must also be enough clearance on both sides of the door for maneuvering. 

3. Floor Space and Turning Radius 

Bathrooms need to have enough floor space for a wheelchair user to turn around comfortably. The recommended turning radius is at least 60 inches.

4. Toilet Specifications

Toilet Specifications

Height: Toilets should be between 17 and 19 inches high from the floor to the top of the seat.

Clear Floor Space: There must be at least 60 inches of clear floor space in front of the toilet for wheelchair access.

Grab Bars: Grab bars should be installed on the wall next to the toilet, as well as behind it, to aid in transferring on and off.

5. Sink Requirements

Sink Requirements

Height and Knee Clearance: Sinks need to be mounted at a height that allows for knee clearance underneath for wheelchair users.

Faucet Controls: Faucets should be easy to operate with one hand, such as lever-style handles.

6. Shower and Bathtub Specifications

Size and Threshold: Showers should be at least 36 inches wide and 36 inches deep, with a low threshold for easy entry.

Grab Bars: Grab bars must be installed in showers and tubs for safety and support.

Shower Seats: Built-in or portable shower seats should be provided.

Hand-held Shower Head: A hand-held shower head with a hose at least 59 inches long is required.

7. Accessories (Towel Bars, Mirrors, etc.) 

Bathroom accessories like towel bars, mirrors, and dispensers should be installed at accessible heights and locations. When sourcing these items, consult with bathroom accessories distributor to ensure ADA compliance for product selection and placement.

Planning and Design Considerations

1. Bathroom Layout and Space Planning

When designing an ADA-compliant bathroom, careful space planning is mandatory. Consider the placement of fixtures, clearance requirements, and maneuvering space.

2. Choosing Accessible Fixtures and Materials 

Select fixtures and materials that are easy to use and maintain. Look for features like lever handles, non-slip surfaces, and contrasting colors for better visibility.

3. Lighting and Contrast 

Adequate lighting and contrast are essential for visibility and safety. Use bright lighting and consider colors that provide good contrast between surfaces and fixtures.

4. Slip-Resistant Flooring 

Choose slip-resistant flooring materials to prevent accidents and ensure safe mobility within the bathroom.

Tips for Renovating an Existing Bathroom

Renovating an existing bathroom to meet ADA compliance can be challenging, especially in older homes or buildings. However, with careful planning and the right strategies, it’s possible to create an accessible bathroom that meets the needs of everyone. Here are some tips to help you navigate the process:

1. Assessing the Current Bathroom 

Before starting any renovation work, it’s important to assess the existing bathroom thoroughly. Take detailed measurements of the space, note the locations of plumbing fixtures, doors, and windows, and identify any potential structural limitations. This assessment will help you determine what modifications are necessary and feasible.

2. Addressing Structural Limitations 

Addressing Structural Limitations

Structural limitations, such as narrow doorways, low ceilings, or limited space, can pose significant challenges when renovating for ADA compliance. In some cases, you may need to consider relocating or reconfiguring fixtures or even exploring options for expanding the bathroom’s footprint.

If structural changes are not possible or feasible, you may need to get creative with your design solutions. For example, you could consider using pocket doors or bi-fold doors to maximize space or installing a curbless shower with a sloped floor to eliminate the need for a threshold. You can get in touch with an expert bathroom accessories distributor for more information and guidance.

3. Temporary Solutions during Renovation 

If you’re planning to renovate the primary bathroom in your residential project, it’s essential to have a temporary accessible solution in place during the construction process. This could involve setting up a portable shower stall or temporary grab bars in another bathroom or creating a makeshift accessible area in another part of the home.

4. Maximizing Space 

In many existing bathrooms, space can be limited, making it challenging to meet ADA clearance requirements. To maximize bathroom space, consider relocating fixtures or using compact, wall-mounted options. For example, a corner sink or a wall-mounted toilet (which can be sourced from a toilet accessories supplier) can free up valuable floor space.

5. Prioritizing Safety 

Prioritizing Safety

Safety should be a top priority when renovating an existing bathroom. Incorporate features like slip-resistant flooring, grab bars, and adequate lighting to reduce the risk of falls and accidents. Additionally, ensure that any changes or modifications comply with local building codes and regulations.

6. Future-Proofing 

While renovating for ADA compliance, it’s also worth considering future-proofing your bathroom. Incorporate design elements that can easily be adapted or modified as your needs change over time.

For example, installing reinforced walls for future grab bar installations or choosing fixtures that can be adjusted in height or position.

Renovating an existing bathroom to meet ADA standards can be a complex undertaking, but with careful planning, creative solutions, and the right professionals, you can create an accessible and functional space that meets the needs of everyone in your household or facility.

Additional Resources

1. ADA Guidelines and Standards 

Refer to the official ADA guidelines and standards for the most up-to-date requirements and specifications.

2. Local Building Codes and Regulations 

Check with the local building department to ensure the bathroom design complies with all relevant codes and regulations.

3. Accessibility Consultants and Experts 

Consider consulting with professionals who specialize in accessible design and ADA compliance for expert guidance and recommendations.

Where Can You Buy ADA-Compliant Bathroom Accessories?

For ADA-compliant bathroom accessories, trust AORBIS. We are a leading bathroom accessories supplier that offers a wide range of ADA-compliant toilet and bath accessories that meet the highest standards of quality and performance. AORBIS’s expert team can help you select the perfect ADA-compliant bathroom accessories for your projects.

Contact AORBIS today to learn more.

Parting Thoughts

Designing an ADA-compliant bathroom is not only a legal requirement but also a matter of inclusivity and accessibility for all. By following the guidelines outlined in this guide, you can create a functional and comfortable bathroom that meets the needs of your clients and projects. Remember, small adjustments can make a significant difference in ensuring independence and dignity for those with disabilities or mobility challenges.

FAQs

Are ADA bathroom requirements the same for residential and commercial properties?

While many of the ADA requirements apply to both residential and commercial bathrooms, there are some differences. For example, commercial facilities are held to stricter standards with additional provisions for things like ambulatory compartments and accessible bath/shower controls. It’s important to consult the specific guidelines for your property type.

Can I renovate my existing bathroom for ADA compliance, or do I need to start from scratch?

In many cases, it is possible to renovate an existing bathroom to meet ADA standards by making strategic modifications like widening doorways, reconfiguring fixtures, installing grab bars, and ensuring proper clearances. However, extensive structural changes may be required in some older buildings or very small bathroom footprints. Consulting a professional is advisable.

What are some cost-effective ways to make a bathroom more ADA-compliant?

There are several budget-friendly approaches such as installing inexpensive grab bars, switching to lever-style faucet handles, using portable shower seats or benches, and ensuring proper lighting and contrast. Prioritize safety features first, and consider long-term investments that increase accessibility like curbless showers or adjustable-height sinks/toilets when renovating.

Prioritizing Accessibility: ADA Compliant Doors, Hardware and Bathroom Accessories

Did you know that people with disabilities are the fastest-growing group in the US and have a lot of buying power, over $1 trillion each year? They go to all kinds of places, so it’s really important to make sure your space is accessible to everyone. Not only is this the right thing to do, but it’s also required by law.

The Americans with Disabilities Act (ADA) was created to make sure people with disabilities have the same chances to access businesses as everyone else. At AORBIS, we’re experts in making sure your building meets these ADA guidelines with our doors, hardware, and bathroom accessories.

We make it simple to follow ADA standards by guiding you through each step, so your facility is not just ADA compliant but also truly welcoming. Let AORBIS help you create a facility that’s accessible and friendly for everyone.

Why Should your Facility be ADA Complaint?

ADA Compliance
It’s the Law: ADA compliance isn’t optional. Failing to comply can result in huge fines of up to $150,000.

Reach More Customers: Nearly 1 in 5 Americans lives with a disability. By making your business a disabled friendly facility, you tap into a significant and diverse market.

Cater to an Aging Population: As people age, more will need ADA compliant accommodations. Staying compliant helps you serve this growing demographic.

Build a Good Reputation: Compliance with ADA standards can enhance your reputation in the disability community, leading to positive word-of-mouth and more referrals for your business.

Show Social Responsibility: Most prefer businesses that demonstrate social responsibility, which can boost your brand’s image.

Tax Benefits: The IRS offers tax credits of up to $15,000 for ADA-related improvements, making compliance financially attractive.

Make Your Doors and Hardware ADA Compliant

ADA Door and Hardware Requirements

ADA Compliant Doors:

To ensure you have ADA-compliant doors and are accessible to everyone, you need to follow some key guidelines.

At least one door for each accessible room or entrance must meet these ADA standards. Measure the clear width from the stop, where the door rests when it’s closed, to the door’s face when it’s open at a 90-degree angle. For sliding or folding doors, measure to the edge. Make sure nothing sticks into this clear width below 34 inches.

You should also provide enough space for people using wheelchairs or other mobility aids to move around comfortably. For hospital patient rooms, you don’t need extra clearance beyond the latch side of the door, as these doors are usually wider to fit beds and gurneys. They are also often placed close to walls to help with movement and privacy.

Be aware of thick walls, shelves, and columns, as they can obstruct access to doors. If anything within 18 inches of the latch side of the door sticks out more than 8 inches, you need to create enough space for a wheelchair to approach the door. This space should be set in so that it’s no more than 8 inches from the door’s face.

If you have multiple doors in a row, make sure they are spaced at least 48 inches apart, plus the width of the doors. This allows people to get through one door before opening the next. This rule also applies to doors that are directly across from each other.

As a general rule, ensure there is a wheelchair space of at least 30 inches by 48 inches beyond the swing of a door. This is especially important in areas like vestibules where doors are next to each other, to ensure there’s enough room to clear one door before opening the next.

ADA Compliant Hardware:

ADA Compliant Hardware

To make sure doors are easy for everyone to use, the hardware needs to be designed for accessibility. It should be easy to operate with just one hand and shouldn’t require tight gripping, pinching, or wrist twisting. The ADA door hardware requirements state that it should be operable with no more than 5 pounds of force and installed between 34 and 48 inches above the floor.

Choose hardware that can be used with a loose grip or a closed fist, like lever handles or U-shaped pulls. While its best if the hardware can be operated with a closed fist, it’s not a strict rule. Round door knobs don’t work well because they need wrist twisting.

Avoid using latches and locks that have small parts that need to be fiddled with, as they can be hard to use and may not meet accessibility standards if they need pinching. Keys and access cards that are separate from the lockset don’t have to meet these standards, but those that don’t require pinching or turning are better. Hardware that can be used with just one action is preferred, though some designs, like handles with thumb latches, are acceptable.


Recommendation: Pick hardware that’s easy to use with a closed fist or loose grip. Make sure bars, pulls, and similar hardware have at least 1½ inches of space for knuckles to grip comfortably. Avoid hardware that needs fine motor skills or multiple actions to operate.

Also, adjust door and gate closers so that from a fully open position (90 degrees), the door takes at least 5 seconds to move to a nearly closed position (12 degrees). For spring hinges, make sure the door or gate closes within 1.5 seconds from an open position of 70 degrees.

ADA Compliant Bathroom Accessories

ADA Compliant Bathroom Accessories

ADA Compliant Grab Bars:

Place a grab bar behind the toilet, at least 36 inches long, and install it 33 to 36 inches above the floor.

Install another grab bar on the side wall, extending at least 42 inches, also 33 to 36 inches above the floor.

Add an 18-inch-long vertical grab bar above the side wall bar.

Ensure grab bars are smooth, with a 1½-inch gap from the wall, ends, and bottom. They should be sturdy enough to support up to 250 lbs and have rounded edges, with a diameter between 1¼ and 2 inches.

ADA Compliant Toilet Seat Cover Dispensers:

ADA compliant bathroom requirements state that these must be no higher than 36 inches from the floor and make sure they’re within reach of the grab bars.

ADA Compliant Soap Dispensers:

Install soap dispensers so they are reachable from the grab bars, with the dispenser opening no more than 44 inches above the floor.

ADA Compliant Toilet Tissue Dispensers:

Mount these no higher than 36 inches from the floor and position them within reach of the grab bars.

Install the roll tissue so it is 7 to 9 inches in front of the toilet’s leading edge. The outlet should be between 15 and 48 inches above the floor.

ADA Compliant Mirrors:

If mounted above lavatories or countertops, the bottom edge of the mirror should be no more than 40 inches above the floor.

For mirrors not above these fixtures, the bottom edge should be no more than 35 inches above the floor.

Include at least one full-length mirror for accessibility.

ADA Compliant Paper Towel Dispensers, Waste Receptacles, and Warm-Air Hand Dryers:

Place these within easy reach, ideally near an accessible lavatory.

If you have one hand dryer, mount it at 40 inches above the floor; if you have two, one should be at 40 inches and the other at 48 inches.

If reaching is a concern, these ADA Compliant bathroom products may need to be installed as low as 34 inches.

ADA Compliant Sanitary Napkin and Tampon Vendors:

Include these in all women’s restrooms.

Mount them according to ADA standards for operating mechanisms and clear floor space. Prefer push-button designs that require less than 5 lbs of force.

ADA Compliant Baby Changing Stations:

Ensure these meet ADA guidelines for clear floor space, handle and control design, and other specifications.

They should be placed so they don’t block other restroom fixtures and ideally be located in public or family restrooms.

ADA Compliant Combination Units:

These can integrate multiple accessories like toilet tissue dispensers, seat cover dispensers, and sanitary napkin disposals into one unit.

Recessed combination units should be installed in side walls or partitions and should not stick out more than ¼ inch.

ADA Compliant Clustered Single-User Toilet Rooms:

At least two of these must be accessible if they are clustered together.

Accessible units should have the International Symbol of Accessibility unless all units in the cluster are accessible.

ADA Compliant Water Closets:

The centreline should be 16 to 18 inches from the side wall, with a minimum clearance of 60 inches wide by 56 inches deep.

Install grab bars beside and behind the toilet, with specified dimensions for each type.

Position flush valves and plumbing to keep the rear grab bar clear.

ADA Compliant Toilet Paper Dispensers:

Ensure these are within reach from the water closet and no higher than 48 inches from the floor.

Recessed dispensers are preferred to avoid obstructing the space around the water closet.

ADA Compliant Sanitary Napkin Disposals:

Include sanitary napkin disposals in all women’s compartments.

They should be reachable from a sitting position and mounted below the grab bars.

Making ADA compliant facility isn’t just about following the law—it’s about making sure everyone feels included and valued. Partnering with AORBIS means you’re not just meeting standards; you’re creating a future where accessibility is a key part of your business. We’re dedicated to helping you make your facility accessible for everyone, not just because it’s required, but because it’s the right thing to do.

We’re experts in doors, hardware, and bathroom accessories, and we make sure everything meets ADA standards. Whether it’s choosing the right door handles or installing important bathroom features, we handle every detail carefully.

Ready to make your space both ADA-compliant and welcoming? Contact AORBIS today, and let’s work together to do the right thing!

FAQs (Frequently Asked Questions)

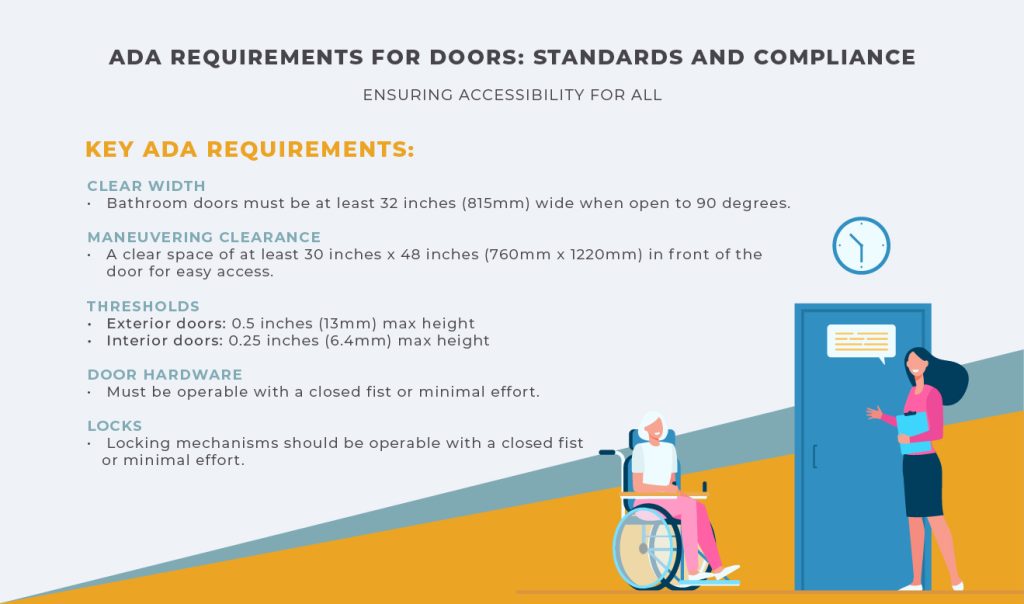
1. What are ADA requirements for doors?

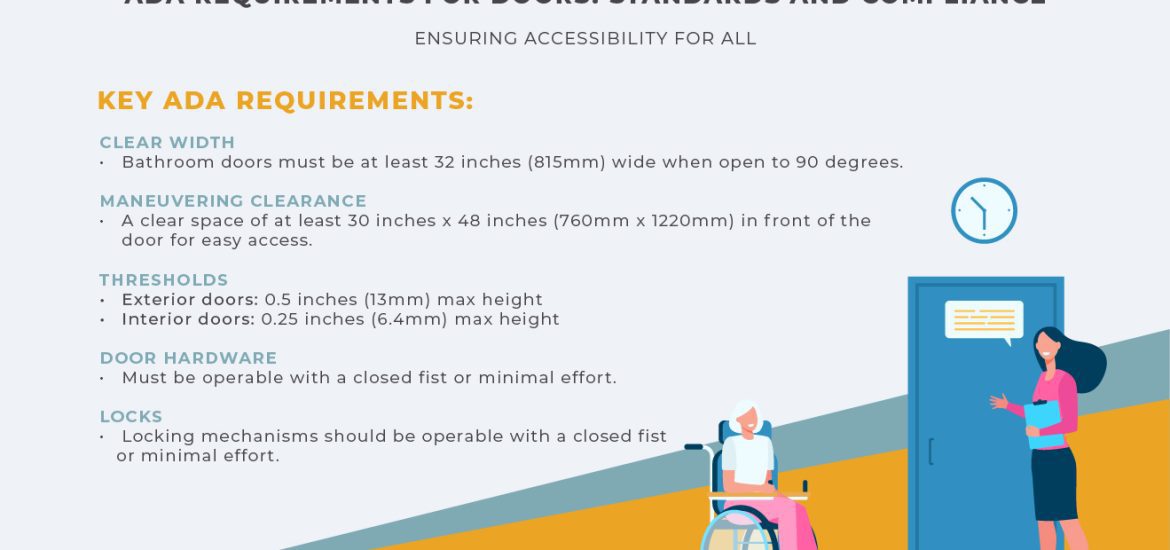
Clear Opening Width: The door must be wide enough for people to pass through easily, with a minimum of 32 inches of clear space.

Maximum Door Opening Force: It should take no more than 5 pounds of force to open interior doors that swing (hinged doors).

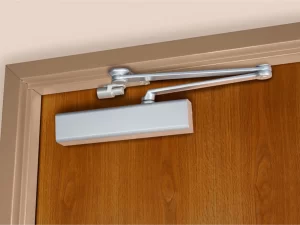
Door Closing Time: Doors with closers (the mechanism that helps it close) must take at least 5 seconds to close completely from when it’s open at a 90-degree angle.

Surface Contrast: While not required by the ADA, it’s helpful to have a visual contrast (like a different color) between the door and the surrounding wall. This can help people with visual impairments easily spot the door.

2. What makes door hardware ADA-compliant?

To be ADA-compliant, door hardware (like handles or knobs) must meet these conditions:

• Operation: You should be able to use it with one hand without needing to grip tightly, pinch, or twist.
• Height: It should be installed between 34 and 48 inches above the floor.
• Force: It should take very little force to open or close the door.

3. What are the threshold requirements for doors under the ADA guidelines?

Height: The threshold (the bottom part of the door frame) can’t be higher than 1/2 inch.

Beveling: If the threshold is more than 1/4 inch high, the edges must be sloped, not straight up, at an angle of 1:2. This makes it easier to pass over.

4. What are the push-pull ADA dimensions for doors? 

For doors that have both a closer (which helps the door shut) and a latch (the locking mechanism):

• On the pull side (the side you pull to open): You need at least 18 inches of clear space past the side where the latch is.
• On the push side (the side you push to open): You need at least 12 inches of clear space past the latch side.

5. What are the steps to access door building regulations?

To meet building regulations for accessible doors:

• Clear Pathway: There must be at least 36 inches of clear space leading up to the door, with no obstacles in the way.
• Landing Area: There should be a flat, level area on both sides of the door. If a wheelchair needs to turn, the area should be at least 60 inches wide.
• Step-Free Entry: The threshold (bottom edge of the door) should be no higher than 1/2 inch. If the entry is raised, a ramp may be needed.
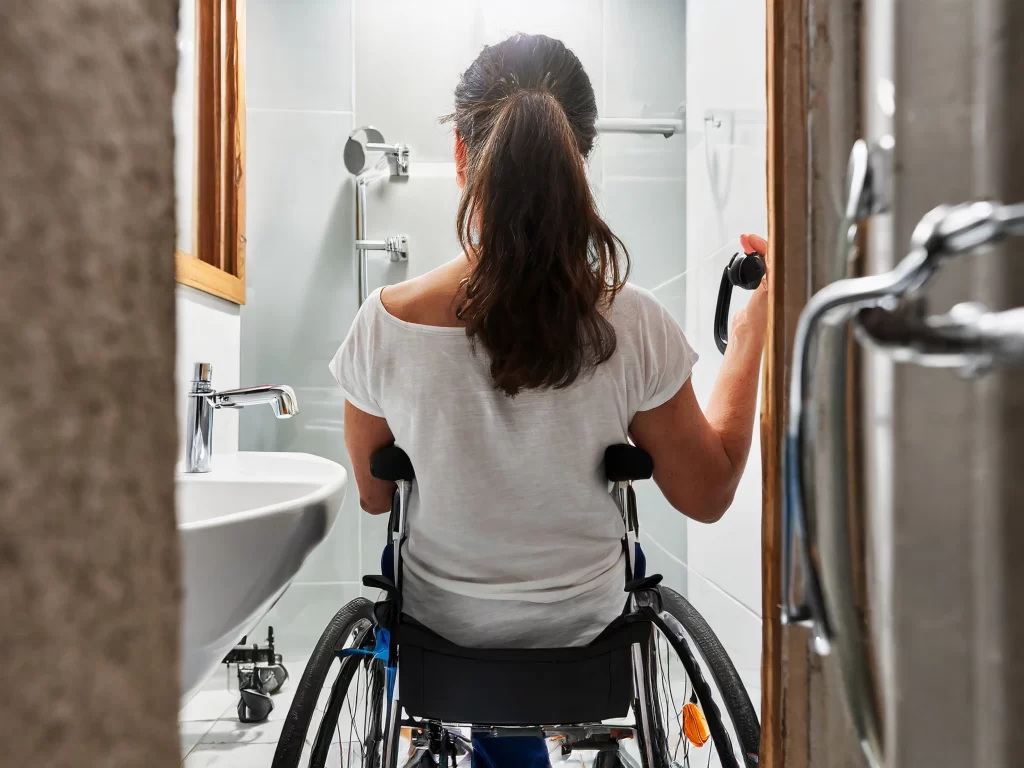
• Door Hardware: The door handle and lock should be easy to use with one hand and shouldn’t need tight grips, pinching, or twisting.
• Accessible Door Width: When the door is open at a 90-degree angle, there must be at least 32 inches of clear space to get through.

6. What is the door handle height required by building regulations? 

The handle or any part of the door hardware that you use to open the door must be installed between 34 inches and 48 inches off the ground. This is required by building regulations to make sure it’s at a comfortable height for most people to reach.

7. What are the ADA door clearance requirements? 

Clear Width: When the door is open 90 degrees, there needs to be at least 32 inches of space for people to get through.

Maneuvering Clearance (how much space you need to move around the door):

• For a front approach (pull side): You need 60 inches of space in front of the door and 18 inches beside the latch.
• For a front approach (push side): You need 48 inches of space in front of the door and 12 inches beside the latch.

Thresholds (the strip of material at the bottom of the door):

• The height can’t be higher than 1/2 inch.
• If it’s higher than 1/4 inch, it must be sloped or beveled so people can easily pass over it.

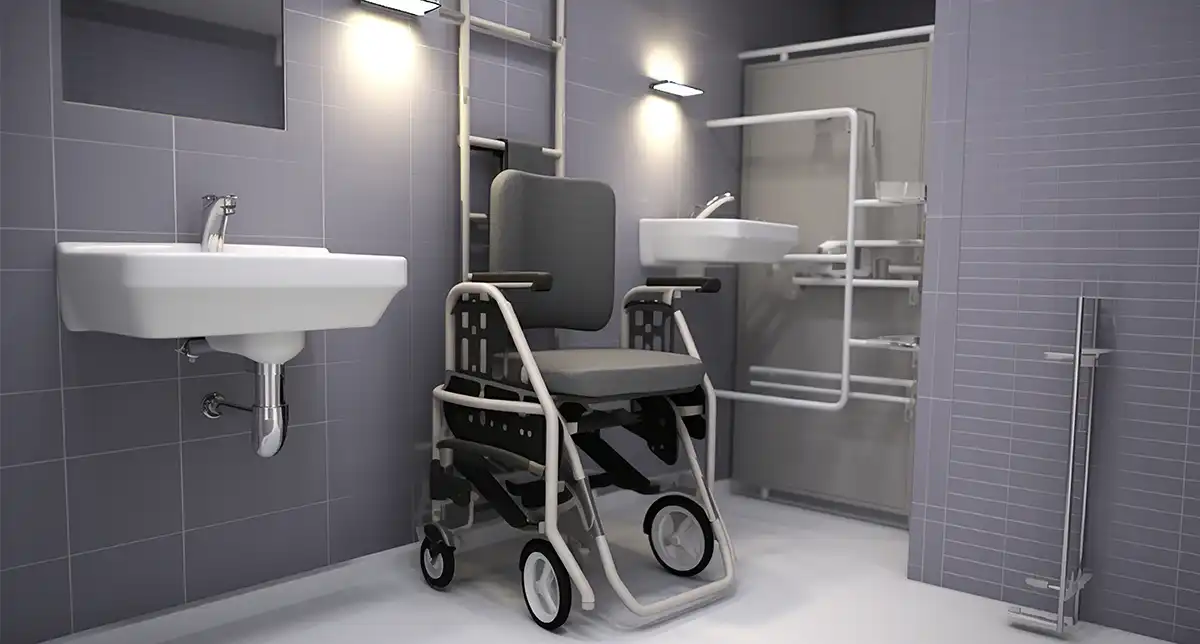
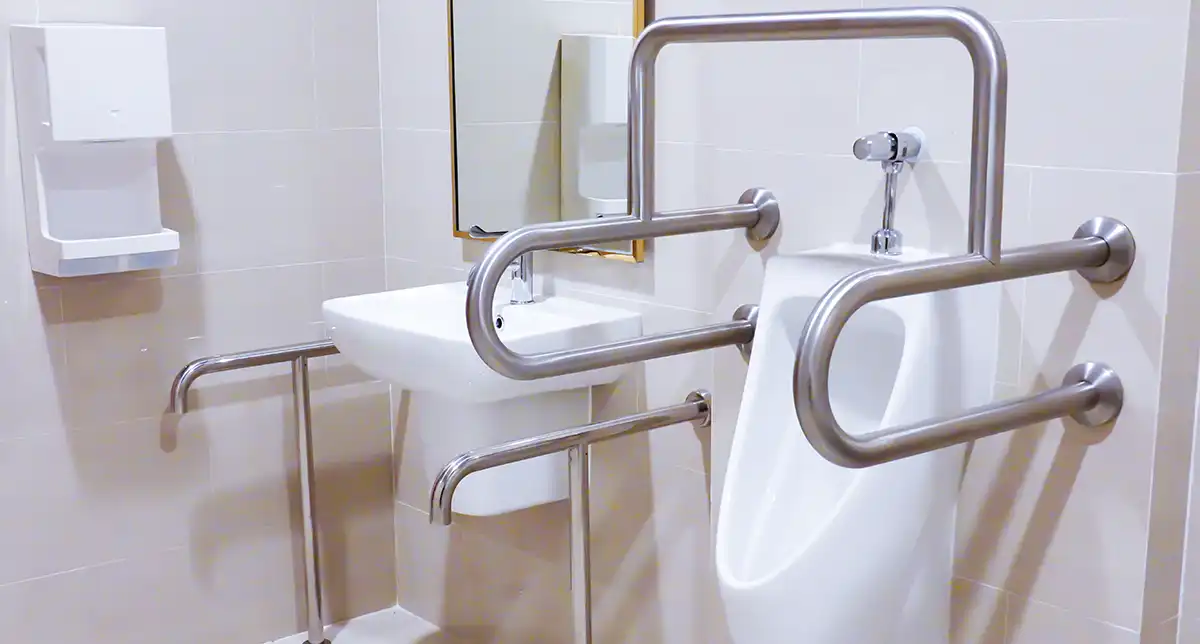
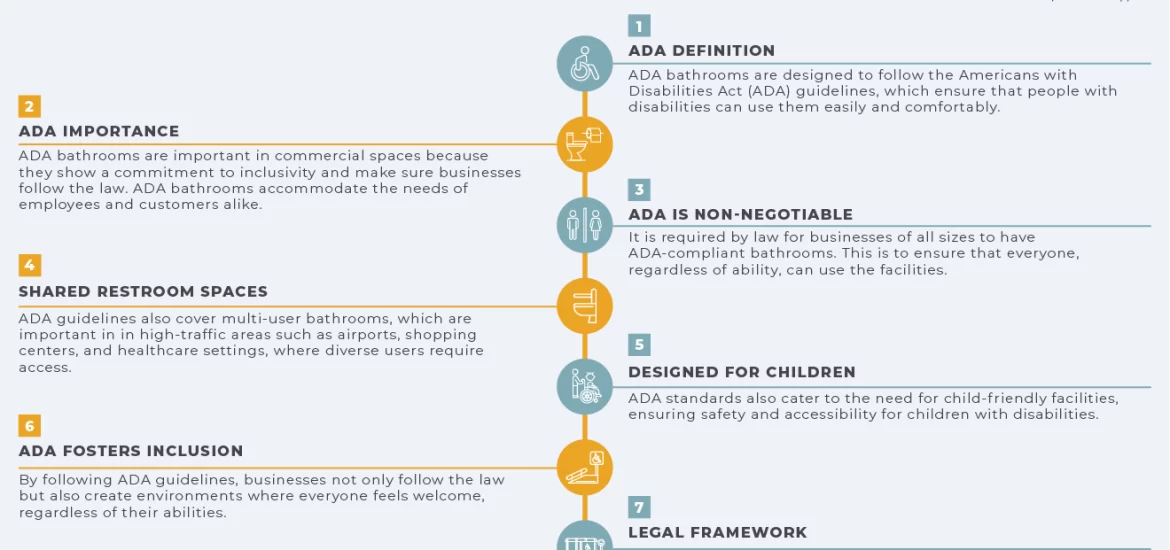
8. What are the ADA requirements for bathroom fixtures? 

For ADA-compliant bathroom fixtures:

• Toilets:

1.  The seat should be 17 to 19 inches above the floor.
2. Grab bars should be mounted between 33 and 36 inches above the floor.

• Sinks:

1. The sink’s rim should be no higher than 34 inches.
2. There must be clear space underneath the sink, at least 27 inches high, 30 inches wide, and 19 inches deep so people can roll up to it.

• Mirrors:

The bottom edge of the mirror should be no higher than 40 inches from the floor.

• Shower Stalls:

1. The size must be at least 36 x 36 inches.
2. They need grab bars and easy-to-use controls.

9. How to make a bathroom ADA-compliant? 

To make a bathroom ADA-compliant:

• Install grab bars around toilets, showers, and tubs to help with stability.
• Make sure sinks and counters have enough space underneath for people to roll a wheelchair up to them.
• Use lever handles or other ADA-friendly fixtures (like faucets) that are easy to operate.
• Keep enough floor space for wheelchair movement, usually 60 inches in diameter to allow for a full turn.